
Last year I found out about the Commercial Pattern Archive at the University of Rhode Island (I thought I had blogged about it, but I can't find anything -- I found out about it on dressaday.com) when they had a week of free access. If you've never heard of the collection, it's an archive of sewing patterns from the 1860s to the present -- I believe they have something like 50,000 patterns! The original (complete) patterns are in their archives and available to researchers, but you can access a good bit of info online. Membership isn't cheap, but I got in on a group membership and have been wasting time there ever since!
I've often wondered if I would ever be able to recreate a pattern from the information they have online (usually you get an image from the front of the pattern, plus a "pattern schematic"; you get some text info but no instructions). I'm sure if I could draft patterns I could do it just by looking at the picture but, well, I can't draft patterns! But I finally decided to give it a go as a reward for all the boring utilitarian sewing I've been doing.
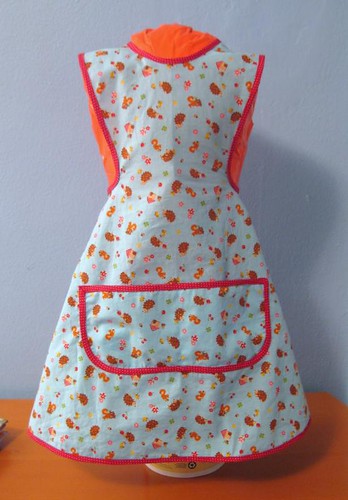
I thought an apron would be easy, and making it for Emily would keep it smaller in case I had trouble. (Plus, she is low on aprons having grown out of all but 1 baking apron.) To my surprise, it was a pretty simple operation! Within a couple days, Emily had a new vintage-y apron! It's super-cute, functional and very girly, so she loves it.
In fact, a second one is already cut out and ready to sew -- but this time, it's made from some Tenggren Saggy Baggy Elephant fabric! So cute! Now I think I have to make one for myself.
If you want details on the probably boring technical process, keep reading; otherwise, have a good week and stay tuned for a cool chocolate dessert recipe coming soon!
My unwieldy reconstruction process:
The first thing I did was to just google the pattern (Simplicity 7091) and see what I could find -- I was able to find images of the pattern envelope, which I printed out and used as visual reference (not to mention, to help estimate the amount of bias binding I'd need!)
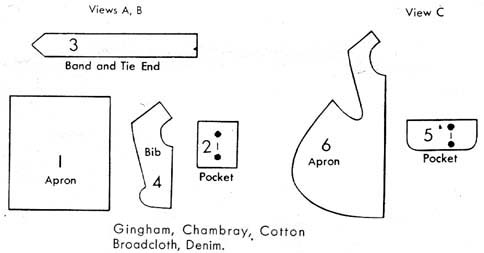
Next, I edited the pattern schematic in photoshop to only contain the pieces for the view I was making (view C), overlapping the pieces so that they would take up less room when printed (here's the image).
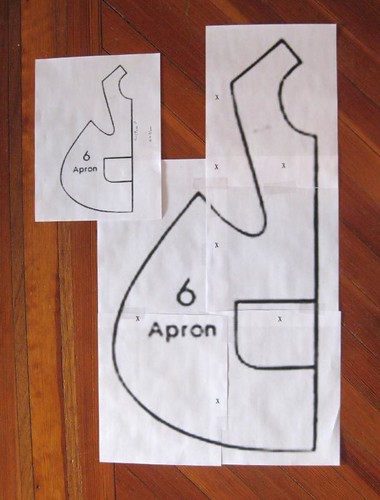
I then enlarged my resulting image to fill an 8-1/2" x 11" piece of paper, and printed it. I chose a key line (in this case the center front fold line), measured it, figured out how long it should be on the final pattern, and then used a proportion calculator to find out how much more it needed to be enlarged to print out at the size I wanted it. (At this point, I also scattered little "x" marks all over the image so I'd have an easier time matching everything up when I blew it up further.)
Finally, I enlarged the image again by the percentage the calculator gave me, printed it out in pieces and then taped it all together. Here you can see the 8-1/2"x11" version next to the full-size printout after assembling it.
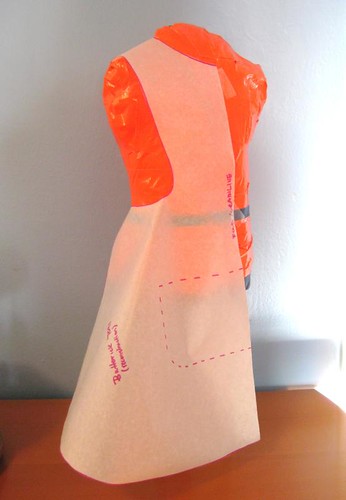
From that point on, I did what I'd do with any pattern you need to trace -- I traced it onto pattern paper and did a tissue fit, I went ahead and did a muslin, to make sure it really would work, and at last I made up the final version.
Definitely a fun challenge, although a lot of people might not think so!
So cute! I just love the hedgies!
ReplyDeleteI remember your posting the link to the pattern archive - I spent many, many hours on there in the few days that were left on the free week lol! I haven't actually attempted to make anything yet, but that's another story altogether...
Adorable!! Yes, you did blog that site. We went and spent as much time there as we could while it was still open and free! It's an awesome site!
ReplyDeleteHow funny, I was sure I had but I used the search and couldn't find it. My google-fu must have choked momentarily!
ReplyDeleteAnd thanks!! I'll post the Saggy Baggy Apron when it's done!