

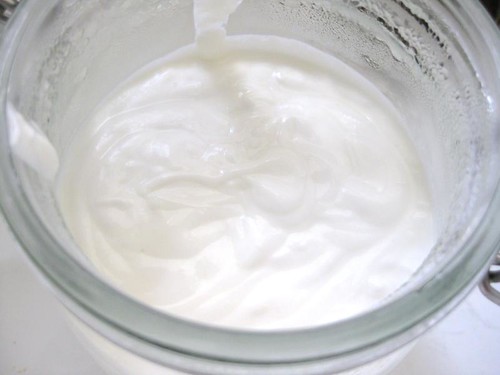
A big jar of fresh yogurt
A little back story: we eat a fair amount of yogurt around here. Emily has been eating it since she was tiny, and from the get-go I bought plain yogurt and added fruit purees instead of buying the commercial stuff. I found that I really needed to buy a better brand of yogurt, but getting those giant cartons was really adding up. I was super-intimidated by the idea of making my own yogurt since all the directions I had read involved either a lot of equipment, or an oven with a pilot light, or a system involving warm water and a cooler.....but then, I read the book Milk
I tried it, it worked, and I've made all our yogurt for about 2 years now. Here's how I do it (after some tweaking and experimenting). You will need: milk (I prefer whole milk), some starter yogurt (it can be anything as long as the cultures are live; I started mine with Stonyfield Farm plain), your candy thermometer
Yum!
Get started: clip your thermometer onto a saucepan, then pour in enough milk to fill the wide mouth container you will use -- 6 cups of milk will fill a 48 oz container and makes a decent size batch. I make twice that, but like I said, we eat a lot of yogurt. Turn the heat on low-med and heat the milk -- stirring occasionally -- until the temp reaches 180º. Note: if you, say, forget that you're making yogurt and lose track of time, your milk can go up to about 220º and it will still make perfectly good yogurt. It won't taste as fresh but you don't need to throw it out or anything. Not that I'm admitting that's happened to me....just saying.
Turn off the heat, and let the milk's temperature drop to about 120º. When it gets close, fill your thermal container with hot water and let it sit for at least 5 minutes. Get your starter yogurt out and put a few tablespoons into a small bowl (I use maybe 2 tablespoons per 6 c milk but my experience has been that you don't need to be too precise) and let that sit as well.
When the milk cools down to 120º, remove the thermometer and skim off any skin that may have formed, then ladle some milk into the bowl with the starter yogurt, whisking until ismooth. Add more milk if it's too thick. Pour the mixture back into the saucepan with the rest of the milk and stir. NOTE: do not let it go below 120º, this is the one mistake that will ruin the yogurt.
Empty the thermal container and wipe dry, pour milk mix into container and close it up. Let sit for 5-6 hours. Your timing my vary - you'll get a feel for how long it needs to sit based on your particular milk/yogurt/environment over time.
When it's time to check it, open the lid of the container and carefully use a spoon or spatula to just check the texture of the yogurt -- it should be like a soft custard. At this point you can either use it as it is -- just pot it up and refrigerate it, or for a smoother yogurt, pour it into a large bowl and stir before potting up. Or, at this point you can drain it for a "greek-style" yogurt. Which is what we do.
To drain it, I use a mesh strainer over my biggest stockpot, with an old (and very clean) tea towel lining the strainer. You can use fine cheesecloth, gauze, or even an old piece of cotton as long as it's clean and lint-free. Pour the yogurt into the strainer and cover (with a towel, or anything, just for dust -- I can sit the lid of the pot on top of the strainer, so I do that). You'll hear the whey start dripping right away! It takes 1-2 hours to drain, depending on your strainer and cloth -- I only need about an hour. You want about 2 cups of whey to come out of a 6 cup batch. Again, this doesn't need to be too precise. The longer you drain it, the thicker it gets, so try different draining times to see what you like best.

Here's how thick I make my yogurt. Do you think I go overboard a little?
When it's ready, scrape it all into a large bowl and you can do two things -- if you want it to be very set, just mix it with a wooden spoon a few times to smooth it out. It will be very firm but it will have small lumps in it. If you want it to be very smooth, whisk it briefly. This will break the curd, so the final product will be looser, but very smooth. I do it the 2nd way.
Finally, just put it in the fridge and let cool! Then add whatever mix-ins you want. We add strawberry puree and peach puree for Emily; I mostly eat it with a little honey mixed in, or preserves (cloudberry jam yogurt is delicious!) This will last a lot longer than commercial yogurt -- I've never had mine go bad, just get more and more sour. Just remember that you need to save a little starter for your next batch.
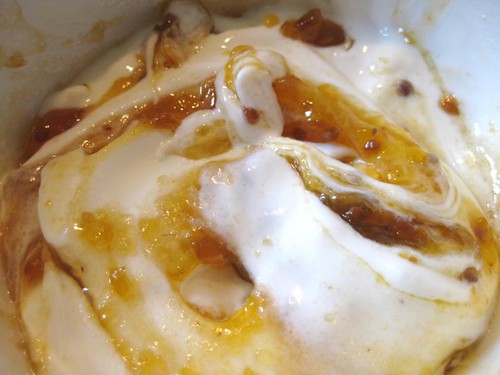
Cloudberries in my yogurt!
A few final notes:
I don't scald or sterilize anything. I haven't had anything weird happen, even the yogurt that has gotten left by accident has never grown anything, just gotten more and more sour.
I have successfully restarted my yogurt from a bit of frozen starter after travelling, so if you're going away just pop enough to start your next batch in the freezer.
If you use skim milk, you may need to add some dry milk to get it thick enough. I have never done this so I don't really know how it works. I'm all about the whole milk yogurt.
If you don't drink milk, you can use this method with soy milk! Check out these instructions from I Eat Food, which even tell you how to make the soy milk!
Hooray and thanks! I'm going to try this...sometime soon...ish.
ReplyDeleteAha! I had heard about this method and wanted to try it! You have encouraged me. xoxo
ReplyDeleteMiss you! Sorry, my anxiety ramped up hardcore the last few weeks so I have been hibernating. HUGS.
I go through (what I think is a lot) of yogurt but it isn't that big a part of my food budget (40 cents for a small container but I suppose I could help conserve if I used a reusable container since I know my work place isn't recycling anymore). Much appreciated to see this, though. I'm very tempted to experiment with this.
ReplyDelete